Our ludum dare entry this time around has had quite some overwhelming feedback! For this reason, we’ve decided to continue development of our game. This means that we’re bringing Ten Second Sketch to mobile devices! The game is going to be free of charge, aswell as free of adds!
In order to enhance the experiance for our users, we’ve taken multiple actions:
1. We’ve optimized the game rendering and collision detection.
Optimized rendering was achieved by batching all obstacles. We also added scaling of blocks, allowing us to use just one scaled block with repeating texture coordinates instead of multiple small. A huge performance boost compared to our old naive approach! On some levels we managed to cut down the amount of floats needed for our vertices from ~200k to ~5k! Adding this scaling of blocks also had a huge impact on collision detection. We’ve always been using first a broad phase where the obstacles at a nearby Z coordinate are found, and a narrow check where these objects are checked for collision. Now everytime you’re close to a wall, you’ll be checking collision against one block instead of the previous 100!
2. We’ve fixed bugs with the collision detection from our previous entry. It should, for example, no longer be possible to fall through the ground at level 8.
3. Garbage Collection removal
All unnecessary garbage collecting has been removed. This means that the game runs much more fluently on mobile devices. Pooling all obstacles before removing them from the current level was one of the major improvements that we did. We also had a lot of lazy additions of ”new Vector3”:s in our code. All of these have been replaced with static references to computation vectors.
4. Level polishing and additions.We’ve removed levels that we considered too boring, and replaced them (it) with multiple new and exciting levels! We’re still making new levels on a daily basis, and the game is going to contain some very difficult levels for the most dedicated!
5. New features!
We’ve added some new features to the game! Examples: Bouncy blocks and boost blocks! A bouncy block will cause you to bounce in the opposite direction of the one you’re heading – landing or driving on top of one will cause you to jump, rotating into it will cause you to rotate in the opposite direction for a moment. Boost blocks will cause you to travel at increased speed for a while after colliding with them (very similar to how the user controlled boost works). These two new block types allow us to create some very interesting and smooth levels – prepare to feel like a god while racing the pipe of Ten Second Sketch!
If you would like to look at our entry for LD27, visit Ludum Dare
If you would like to stay updated and be notified of the release of our game, please follow us on twitter: https://twitter.com/daggergamedev
Ten Second Sketch was made with the help of the amazing game framework libGDX.
Our second attempt on Ludum dare has just ended. The theme this time was 10 seconds. We were somewhat disappointed as we would have preferred a more original theme. While discussing the theme, we thought that there were going to be a lot of similar games and we wanted to stand out! For quite a while we struggled to come up with a unique idea fitting to this theme. We then remembered an idea we actually had talked about just the previous week.
The discussion started when we found a sketch of a game Edvard and Gustav were involved in during their bachelor's thesis. We sometimes do friendly harassing of each others and I jokingly told them that their sketch were much better looking then their final product, and that they should have made a game with those graphics instead. Then we thought about it, agreeing that it would actually be pretty cool!
We recalled that moment and decided to try it out! After our project was set up and we had a frame displaying a black sun with a long rod piercing through it, it was definite!
Last time we had a really talented artist with us, André, who unfortunately were too busy to join us this time. As none of us know any real modelling, we decided to proceed with simple quads, textures, and imagination.
My head nearly exploded trying to draw a 2D ship from that point of view.
Once again, we are impressed with what you can achieve in such a short time frame, and we are very proud to have completed yet another game.
It’s been a while, but we’ve kept busy! Most of our recent work has been with the engine of our game, as well as the server. However, we recently started working on making the spells of our game look better – and this post is going to explain how we did explosions!
The Idea
So, the idea here is that we use a system very similiar to how the particles of our game work. This means that we’re batching a whole lot of quads, and rendering them each frame with just one drawcall. In order to keep the system dynamic and allow for the actual animation, we need to recalculate the vertices of the mesh each frame.
To do the animation, we provide a textureatlas containing (in our case) 8 rows and 8 columns. Each cell represents the state of the animation at a given time, and we set a variable called ”textureVal” to tell our system which cell it should use at any given time.
Below you can see what our Billboard and Billboard system classes look like:
public class Billboard {
    public Vector3 position;
    public Matrix4 modelMatrix;
    public float[] colorTint;
    public float timer, texVal, size;
    public boolean dead;
    public Billboard(float x, float y, float z) {
        modelMatrix = new Matrix4();
        position = new Vector3();
        colorTint = new float[4];
        reset(x,y,z);
    }
    public void reset(float x, float y, float z) {
        dead = false;
        texVal = 0f;
        position.set(x,y,z);
        for (int i = 0; i < 4; i++)
            colorTint[i] = 1;
        size = 5f;
        modelMatrix.setToTranslation(position);
    }
    public void step(Game g, BillboardSystem sys) {
        timer += Gdx.graphics.getDeltaTime()*1000;
        if (timer > 30) {
            timer -= 30;
            // There are only 64 textures in the atlas. See BillboardSystem.java.
            dead = texVal++ >= 64 ? true : false;
         }
     }
 }
So, the approach we used was quite simple and it took less than an hour to get the system running. However, if you have any questions – don’t be afraid to ask them here or find us on #libgdx over at freenode!
Here’s a video to demonstrate the result of our implementation:
The website is starting to look good enough to replace the old one. This will allow us to use much better indentation for the code we post on our blog, as well as offer us a lot of other cool features that we previously did not have.
So, I guess all that remains is to welcome you to our new home!
We’ve been using the old libgdx 3d api for about 7 months now, in order to develop our game. We recently (last week or so) decided to make the transition to the new 3d API to keep our libgdx versions up to date with the nightlies. The transition itself was rather simple, and we’re still keeping things at a level very near what we used in the old API. For example, we’re not using the modelBatch class nor any of the shaders provided to us.
The main thing that we’ve been missing graphically has been animated 3d objects. We did have a keyframed animation system that we developed ourself to animate between two static states of an obj-model, but the downsides were just too many for us to bother adding it to the actual game.
So, we finally sat down trying to implement animations today. After a few hours of reading through the source files of modelbatch, skeletontest and defaultshader – we finally understood what was going on and could start implementing our own version.
This blogpost will go through how we handle and render our animations, and hopefully others that would like to stick to a lower level of opengl can benefit from it.
The first thing we do is ofcourse to load the file. We do this using the libgdx class AssetManager:
The file can be loaded either as g3db (binary) or as g3dj (json). You can convert the most used file formats to either of these two using the fbx-converter (https://github.com/libgdx/fbx-conv), we used fbx files that our artist created for us.
When the file has been loaded, its time to create the actual objects. We create modelInstances in the constructor of our characters:
Model characterModel = assets.get("data/model/charModelAnim.g3dj");
charInstance = new ModelInstance(characterModel);
animationController = new AnimationController(charInstance);
animationController.animate(charInstance.animations.get(0).id, -1, 1f, null, 0.2f); // Starts the animaton
Now we have our animation set up, and all that remains is for the character to call:
animationController.update(deltaTime);
during its update method.
This is all the logic that we need to do the actual updating of the animation, and it’s time to start thinking about how to render it. In order to render our animated objects, we do the following:
charShader.begin();
// Bind whatever uniforms / textures you need
for (GameCharacter ch : g.characters){
    Array<Renderable> renderables = new Array<Renderable>();
    final Pool<Renderable> pool = new Pool<Renderable>() {
        @Override
        protected Renderable newObject () {
            return new Renderable();
        }
        @Override
        public Renderable obtain () {
            Renderable renderable = super.obtain();
            renderable.lights = null;
            renderable.material = null;
            renderable.mesh = null;
            renderable.shader = null;
            return renderable;
        }
    };
    ch.charInstance.getRenderables(renderables, pool);
    Matrix4 idtMatrix = new Matrix().idt();
    float[] bones = new float[12*16];
    for (int i = 0; i < bones.length; i++)
    bones[i] = idtMatrix.val[i%16];
    for (Renderable render : renderables) {
        mvpMatrix.set(g.cam.combined);
        mvpMatrix.mul(render.worldTransform);
        charShader.setUniformMatrix("u_mvpMatrix", mvpMatrix);
        nMatrix.set(g.cam.view);
        nMatrix.mul(render.worldTransform);
        charShader.setUniformMatrix("u_modelViewMatrix", nMatrix);
        nMatrix.inv();
        nMatrix.tra();
        charShader.setUniformMatrix("u_normalMatrix", nMatrix);
        StaticVariables.tempMatrix.idt();
        for (int i = 0; i < bones.length; i++) {
            final int idx = i/16;
            bones[i] = (render.bones == null || idx >= render.bones.length || render.bones[idx] == null) ?
            idtMatrix.val[i%16] : render.bones[idx].val[i%16];
        }
        charShader.setUniformMatrix4fv("u_bones", bones, 0, bones.length);
        render.mesh.render(charShader, render.primitiveType, render.meshPartOffset, render.meshPartSize);
    }
}
charShader.end();
So basically what happends is, we loop all characters that we want to render. We create an array of renderables, aswell as a pool of renderables. These are needed in order to collect the renderables from the modelInstance (via instance.getRenderables(array, pool)). We also need to create and initiate an array of floats to represent each bone matrix. We have 12 bone matrixes, and each matrix contains 16 floats. Now, we loop all renderables that we have collected, and set the matrixes that we need as usual. We also need to loop and fill the float array with the data from the matrices, if there is such data to be found.
(Also, please note that you should not be creating new objects each rendercall, as in the code above, but instead create them once and reuse them.)
So, there’s all the code we call at the CPU in order to initiate the rendering. Now all that is left is to show our shader code! All the skinning occurs in the vertex shader, and that is why we will only share that this time (Our fragment shader can be found in the normalmap source as linked from another blogpost).
//Firstly, we need to define loads of new attributes, one for each bone.
attribute vec2 a_boneWeight0;
attribute vec2 a_boneWeight1;
....
attribute vec2 a_boneWeight11;
//We also need to take the bonematrices
uniform mat4 u_bones[12];
void main() {
    // Calculate skinning for each vertex
    mat4 skinning = mat4(0.0);
    skinning += (a_boneWeight0.y) * u_bones[int(a_boneWeight0.x)];
    skinning += (a_boneWeight1.y) * u_bones[int(a_boneWeight1.x)];
    ...
    skinning += (a_boneWeight11.y) * u_bones[int(a_boneWeight11.x)];
    //Include skinning into the modelspace position
    vec4 pos = skinning * vec4(a_position,1.0);
    // Rest of code is justlike usual
    v = vec3((u_modelViewMatrix * pos).xyz);
    vsN = normalize(vec3(u_normalMatrix * skinning * vec4(a_normal, 0.0)).xyz); //viewspaceNormal
    gl_Position = u_mvpMatrix * pos;
    v_texCoord = a_texCoord0;
}
So thats basically it, and we got away without having to rewrite our entire render engine to be able to use the new 3d API!
This weekend, 26-29 May we participated in Ludum Dare 26 Jam. An Online Game Jam event where people from around the world create a game in a weekend: http://www.ludumdare.com
Every Ludum Dare has a theme. This time the theme was ”Minimalism”, and our approach resulted in a game we call Nothing. A game we are very proud to have created in such a narrow time-frame.
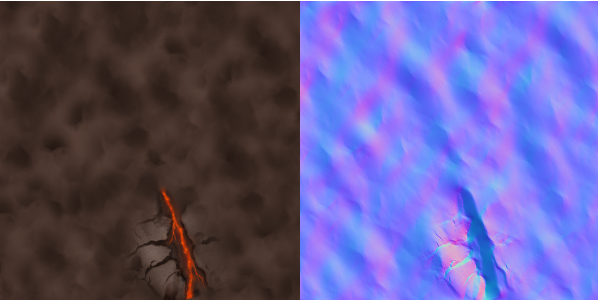
As you may know, normal mapping is a nifty way of rendering a detailed surface, without the need to use an insane ammount of triangles. Since the light rendering we described in a previous post felt like a modest success, we decided to experiment with implementing normal mapping, and of course see if we could make it work in synergy with our existing light shaders. In this post, we briefly describe the theory and our implementation of this nice rendering technique.
So, normal mapping works by modifying the normal for each point on an object, and thus the light will shade as if the surface in that point was tilted. To do this, we will use a texture (the normal map) containing modified normals for the object, in tangent space.
Below we see the color texture, as well as the normal map texture, for our island.
To be able to extract the normals from the texture, and convert them to view space (in which we calculate our lighting) we will not only need the normal, but also the tangent and the binormal. Although the math to calculate these vectors from a simple mesh is not very complicated, we struggled quite a bit with how to do this for an arbirtrary mesh. Luckily, there are almost always people who have already done what you try to do, so we decided to take a shortcut by using an obj-loader created by the very talented Stefan Wagner (http://bompoblog.tumblr.com/). This object loader provides us with a libgdx mesh including the additional tangents and binormals (however, we don’t pass the binormals to the shader since we can calculate it with a simple cross product).
Now, in the fragment shader, we need to create three basis vectors. These will be used with the normal we extract from the normal map, to transform it to view space in the following way:
vec3 n = normalize(viewSpaceNormal);
vec3 t = normalize(viewSpaceTangent);
vec3 b = normalize(cross(n, t));
mat3 basis = mat3(t, b, n);
vec3 tangentSpaceNormal = texture2D(normalMap, v_texCoord).xyz * 2.0 - 1.0;
vec3 N = basis * tangentSpaceNormal;
The vector N can now be used as the normal to calculate the lighting as usual.
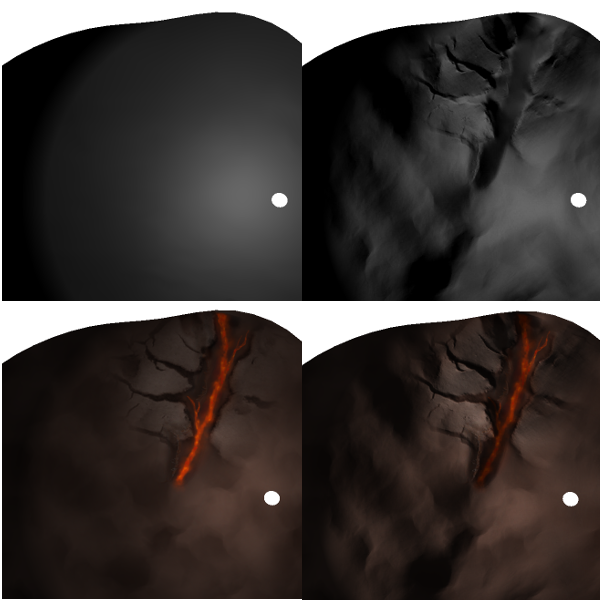
A downloadable apk-demo of our normal mapping combined with the tiled forward shading will be available soon. It is hard to appreciate the effects of normal mapping from an image, but we have tried our best to give you a feel of what is going on with the image below.
Top left: no texture and standard shading, Top right: no texture and normal mapping,
Bottom left: texure and standard shading, Bottom right: texture and normal mapping.
We realise that this is a very brief explanation of normal mapping, and if you want to implement it, feel free to dig through our source code or have a look at chapter 8 in the book Iphone 3D Programming (http://ofps.oreilly.com/titles/9780596804824/chadvanced.html) which helped us alot. Of course, we appreciate any comments, tips, or questions! See ya next time!
A heightmap is a texture where the texels are mapped to an object or the world, and the color of each texel represents the height of the object/world. Generally, a heightmap is a grayscale image, as only one of the texels color channels are needed to read the height of the object. The value of each channel is limited to the range [0.0,1.0]. Here’s a screenshot of a typical heightmap, the one we use: (Scaled down, original size is 1024×1024) Collision Detection
As our game is a top down game, a heightmap is ideal for collision between the feet of our heroes and the terrain. Other techniques are used for collision between players / projectiles and blocking terrain. We know that the terrain used in our game has a maximum height of ”1 modelspace length units” and that the terrain width and height are limited to the range [-10,10]. We also know that our terrain is positioned around origin (0.0,0.0,0.0 worldspace). We can use this to our advantage by ”placing” the heightmap so that it too has its centre in origin. Now we can map between world space X/Z coordinates and the texel coordinates in the heightmap.
We clamp the value, to make sure that if we are outside the terrain we use the same height as if we were to be just on the edge. We could of course just set borders so that it would be impossible for the player to move outside of the terrain – but we prefere our application to not crash even if the player does something bad. (In fact, in our specific use case – the player is allowed to move outside of the map, but will be punished by taking damage over time while staying there.)
We then multiply the clamped value with the total size of the heightmap divided by 2 and 10 and add the heightmaps size divided by 10 minus 1. This means that if our heightmap is 1024×1024, the following calculations will be made:
As you can see, our result will be in the range [1,1023] while the possible lookups are in the range [0,1023]. This is because we could not think of a simple formula that would calculate this in a better way – and the bias is not noticable.
Decals
Collision with ground terrain is not the only usecase we have for our height map. We also use it to efficiently project decals to the ground, so that they follow the terrain. We do this by creating a square mesh – in our case consisting of 8×8 squares. This mesh ranges from -1,0,-1 to 1,0,1 – meaning that it is a 2d mesh following the X/Z axis with at height 0. When it is time to project something, we simply move the mesh to the target, and iterate over each vertice using the heightmap to set the y value. Doing this, we get a lot of z fighting when we try to render the decals. In order to solve that, we simply disable depth testing and depth writing. This means that we can fake projection of decals to the ground in a simple and batchable way. So far, we use these decals to create simple shadows and targetting arrows. But in the near future we will start using animated textures to draw other interesting effects on the ground – such as cracks, ice and heat.
Left – a targeting arrow. Right – shadows of characters and objects.
Here’s a video demonstrating our heightmap – both used for collision and for projection:
In our first blog post we will try to describe the lighting model that we use in our game!
The game:
We are currently developing a top down 3d game for a course called ”Advanced Computer Graphics” at our University. This game is an intense MOBA with loads of spells flying around – and we wanted our spells to emit light! So we thought of a way to do this efficiently on mobile devices!
We believe this approach is suited for pretty much all top down 3d games, possibly even 2d games that want to use normal-dependant shading.
The idea:
The idea is based on tiled forward shading, but as the usecase is a top down game we can avoid the prepass and just cull the light sources very simply and basic on the cpu so that only light sources that are affecting the environment are used for the shading. Because we do not need a prepass I believe this approach can be used with great success on mobile devices, and our tests show that this assumption is correct.
The source (which can be found further down) is somewhat documented, but if there are any unclarities we would love to try and answer your questions. Any suggestions for improvements are also welcome!
Performance:
Here’s a table over the maximum amount of lights we can support with 60(30) fps on the devices we have so far tested on.
From what we read/hear, fragment shaders are limited to a maximum amount of vec4 uniforms (i cant recall the results when I tested this myself..) and that is why the maximum supported light sources are 48 for our method (and 24 for the normal point light method, as that one needs to send radius and color in uniforms aswell.). We will work towards removing this cap in a later version by sending the positions aswell as the color and radius in the texture that now contains only the color and radius. We have not yet done this because it will require some testing (of how many channels are needed for each position float) to make sure that the precision is high enough. We suppose this will also depend on the size of the gameworld.
One important aspect to take into consideration when considering this technique is: the smaller part of the screen that each light affects, the more we benefit from this method!
Loads of small lights = use this!
Loads of superlarge lights = it might not matter too much which approach you pick.
We would love it if you guys would test the -> DEMO <- and provide some info about how well the shader performs on your device.
Source:
The source can be found -> HERE <- and contains all source for the desktop version of the demo, including shaders and assets.
Hi, and welcome to our blog! We’re currently in the middle of a transition from our old blog to this. We’re doing this change now, as we felt that our previous host did not provide us with what we needed.